This is an old revision of the document!
his article describes how to configure a VPN tunnel on a DrayTek Vigor 3900 device.
- Unordered List ItemConfiguring the tunnel on the Management Platform
- Configuring the tunnel on the DrayTek Management Interface
Please follow the steps below:
Configuring the tunnel in the Management Platform
Headline
1. Go to the Gateway in your network from which you want to create the tunnel to DrayTek. Select the three-dotted menu (…) and select Add Tunnel.
2. Select IPSec Site-2-Site Tunnel and select Continue.
3. In the General Settings section fill in the following information:
Name: Choose whatever name you find suitable for the tunnel. Shared Secret: Enter a string of your own or use Generate. Public IP: Enter the public IP of the DrayTek device. Remote ID: Enter a name that will be also used as the name of the VPN profile on the DrayTek device. Perimeter 81 Gateway Proposal Subnets: Choose the specified subnet. By default, this should be set to 10.255.0.0/16. Remote Gateway Proposal Subnets: Select Specified Subnets and specify according to your local LAN Subnets.
4. In the Advanced Settings section fill in the following: IKE Version: v1 Encryption (Phase 1): AES256 Encryption (Phase 2): AES256 Integrity (Phase 1): SHA1 Integrity (Phase 2): SHA1 Diffie-Hellman Groups (Phase 1): 2 Diffie-Hellman Groups (Phase 2): 2 DPD delay: 30s DPD timeout: 120s 5. Leave the rest of the fields with the default values (as shown in the attached image) and click on Add Tunnel.
Configuring the tunnel in the DrayTek Management Interface
Headline
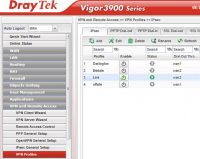
1. Open the DrayTek management interface. 2. In the left panel, select VPN and Remote Access, then select VPN Profiles. Select the add to create a new profile.
3. Under the Basic tab, fill in the following information:
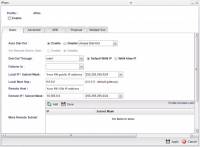
Auto Dial-Out: Enable; Always Dial-Out Dial-Out through: Your WAN interface; Default WAN IP Failover: Should remain with the null value. Local IP/Subnet Mask: Insert your FW external address and specify the correlating subnets. Remote Host: Insert you Perimeter 81 Gateway IP Remote ID/Subnet Mask: By default, upon network creation at the Perimeter 81 Portal 10.255.0.0 and 255.255.255.0/16 are assign. If customized, please make sure to insert the appropriate values.

IKE Protocol: IKEv1 IKE Phase 1: Main Mode Auth Type: PSK Pre-shared Key: Insert the same shared secret you choose while configuring the tunnel at the Perimeter 81 portal. Security Protocol: ESP
4. Fill in the following information in the Advanced section:
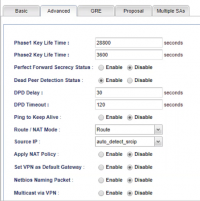
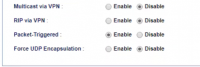
Phase 1 Key Lifetime: 28800 seconds Phase 2 Key Lifetime: 3600 seconds Perfect Forward Secrecy Status: Enable DPD Status: Enable DPD Delay: 30 seconds DPD Timeout: 120 seconds Ping to Keep Alive: Disable Route/NAT Mode: Route Source IP: Auto-detect Apply NAT Policy: Disable Set VPN Default Gateway: Disable Netbios Naming Packet: Disable Multicast via VPN: Disable Rip via VPN: Disable Packet Triggered: Enable Force UDP Encapsulation: Disable
5. Fill in the following information in the GRE section:
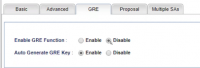
Enable GRE Function: Disable Auto Generate GRE Key: Enable
6.Fill in with the following information in the Proposal section:
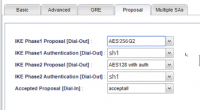
IKE Phase 1 Proposal: AES 256 IKE Phase 1 Authentication: SHA1 IKE Phase 2 Proposal: AWS 256 with auth IKE Phase 2 Authentication: SHA1 Accepted Proposal: Accept
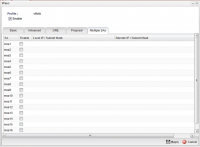
7. Leave the checkbox unmarked in the Multiple SAs section. Make sure to enable the profile and click Apply.
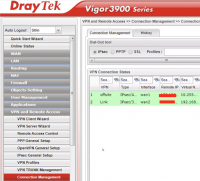
8. If the tunnel is up, the profile will be green in the Connection Management tab: