Getting Started
Welcome to the getting started guide. This will give you a brief overview of the Privatise Company Dashboard.
Once you sign up or are provisioned an account with Privatise, you'll get access to your company dashboard. Privatise works by putting all devices on our virtually impenetrable Remote Office Cluster or ROC. Most of the settings in the company dashboard are related to controlling access and security levels for your company's ROC.
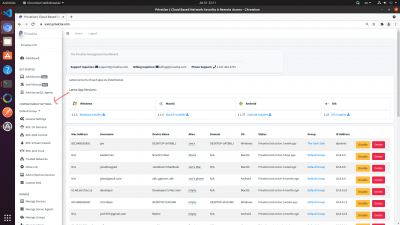
Here is a screenshot if what your main company page should look like. The arrow points where you will see your main company settings.
Default Group Policies
By default, your company devices will be on the default group, and the settings you change will affect that default group. If you go to “Manage Groups” and add an additional group, you will then be able to manage the settings for that group by clicking on the “carrot” or “arrow” next to the Default Group. That will then show a dropdown of all additional groups and you'll be able to change your group.
Provisioning a ROC
To get access to all of your group settings, you'll need to provision a ROC. Please see this guide on provisioning a ROC under ROC on Demand for more information.
General Settings
Here you'll be able to control the general settings of the group you're editing:
1. Enable Privatise over WireGuard: This puts all Privatise agents in the group on the WireGuard protocol. This is good if you have certain devices in an area with latency issues.
2. Enable All Static IPs: This is enabled by default and gives all Privatise agent internal static IPs over the ROC.
3. Enable “Classic” Split Tunneling. This has all internet usage go out over the general internet and not through the ROC, unless implicitely added to the Allow List.
4. Enable Full Control mode: Prevent users from disabling Privatise under any circumstances.
5. Enable Trusted Networks: This will allow users to add Trusted Networks on their Privatise agents. This is not necessary to enable if you're setting up Trusted Networks from the dashboard.
6. Enable Windows Auto-Update. Automatically update agents on Windows.
ROC On Demand
Here you'll be able to provision your ROC for the group and choose the size and location of the ROC. You'll also get access to your dedicated gateway (ROC) IP. Learn more about provisioning a ROC here.
ROC-DNS
ROC-DNS Control. This will allow you to access our enterprise ROC-DNS Dashboard. Here you'll get access to:
1. Custom DNS Forwarding
2. Category based URL filtering
3. Custom local DNS records
4. Allow & block lists
5. Enterprise level web filtering
6. Full DNS server including control over upstream
7. Reports, audit logs, insight into traffic.
More a detailed rundown of ROC-DNS. Please go to ROC-DNS.
ROC Virtual Firewall
The ROC Virtual Firewall will let you set up inbound security policies and to open and close ports. For more information, please visit ROC Virtual Firewall.
ROC Zero Trust (ZTNA)
ROC Zero Trust or ZTNA controls network access for internal traffic over the ROC. For more information, please visit ROC-ZTNA.
ROC Trusted Networks
In certain cases, some companies might be using a separate hardware firewall in the office, and using Privatise for remote work protection. In that case, you may want to disable Privatise for devices that enter the office network. Trusted Networks will allow you to do this automatically.
For more information, please visit ROC Trusted-Networks.
ROC Allow List
Sometimes you'll want to access certain resources outside of the Privatise ROC. For example, certain websites or applications might block access from datacenters. Adding a website or IP address here will allow you to access it from outside of the ROC tunnel.
Alternatively, if you have “Classic Split Tunneling” in the general settings enabled, websites or IP addresses added here will go through the tunnel, and everything else outside of it.
For more information please visit ROC Allow List.
Add & Manage Admin
You can control adding or removing additional admin from “Manage Admin” and “Add Admin” under “Manage” in the left sidebar.
Group Settings
You can add additional groups under the “Manage Groups” setting under “Manage” in the left sidebar. You can then switch between groups by clicking on the arrow dropdown next to “Default Group” under Company/Group Settings in the left sidebar.
For more information, please visit Manage Groups.
